Huber Needle Insertion & Removal Techniques
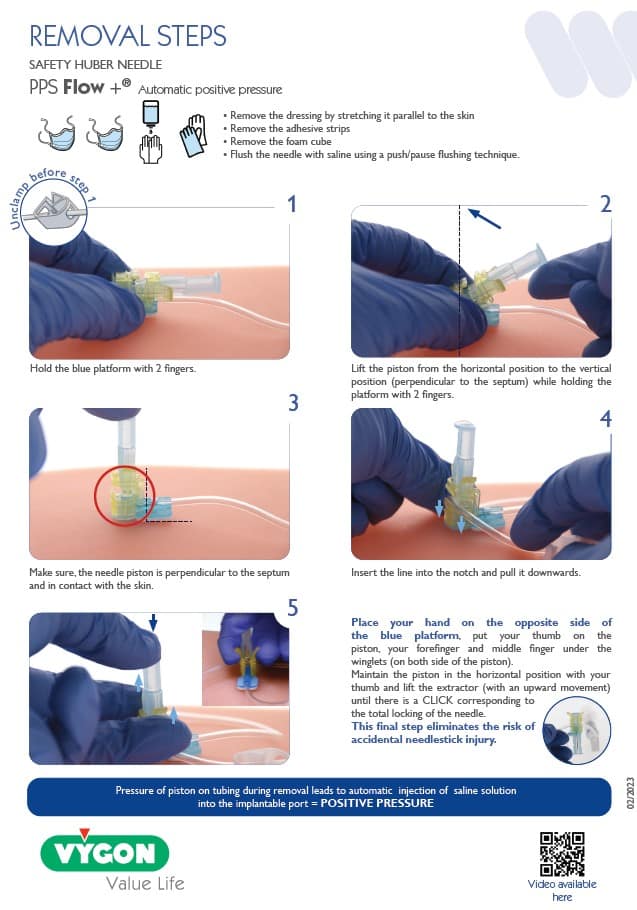
Specific training is required for each brand and design of Huber needle as the mechanism varies from one device to another (the safety mechanism is specific to each system). The clamping sequence is also determined by which type of needle free device is connected, however the needle free device can be removed prior to the needle withdrawal.
Clamping is recommended when the line is not in use.
KEY POINTS
When inserting a Huber or non-coring needle:
- Face bevel away from direction of the port line
- Insert into the centre of the port
When removing a Huber or non-coring needle:
- Precede removal with a Push-Pause / Pulsatile flush
- End with positive pressure
Needle Insertion:
KEY POINTS
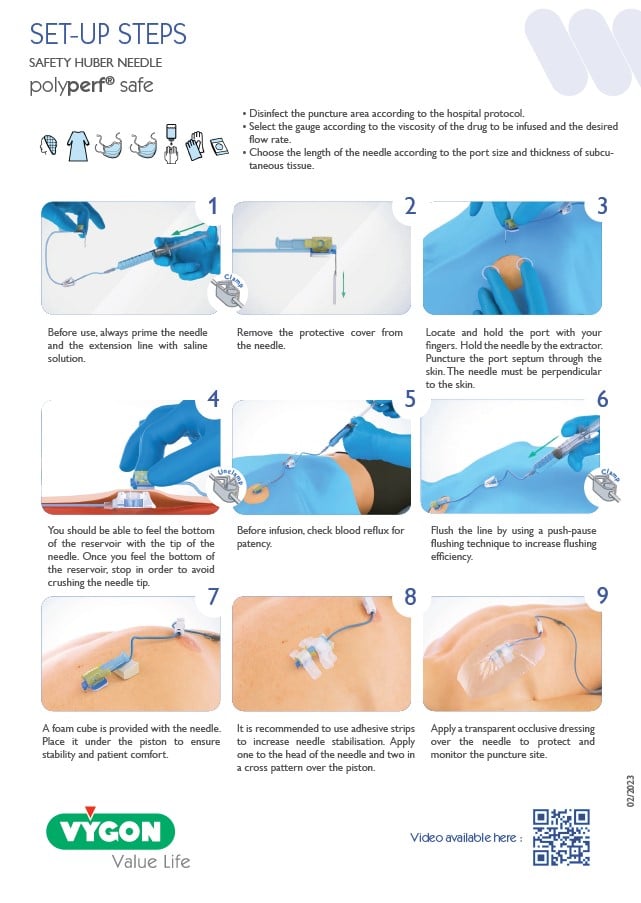
- Port septum should be easily localised.
- Puncture sites must be well distributed over the surface.
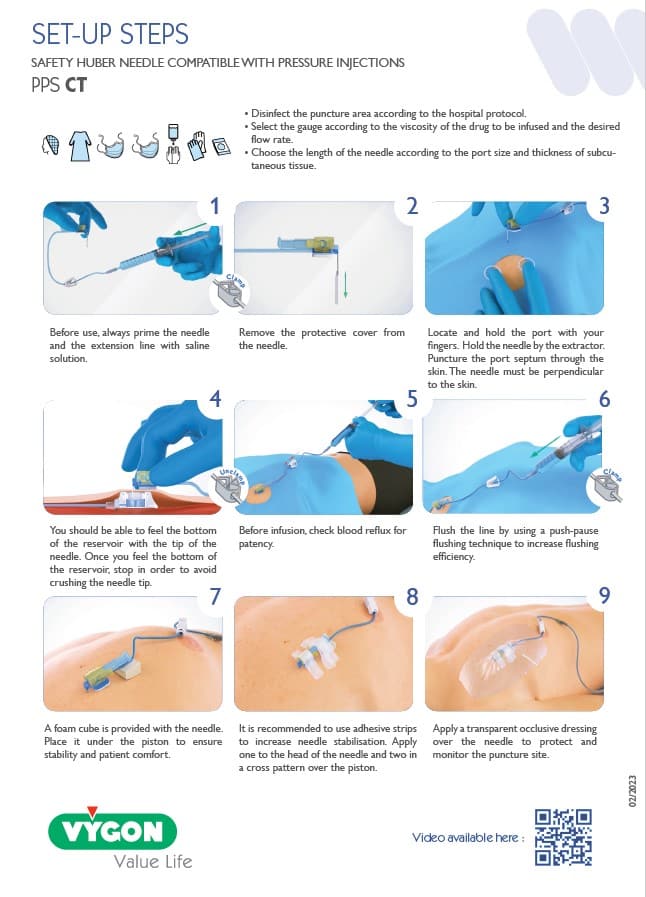
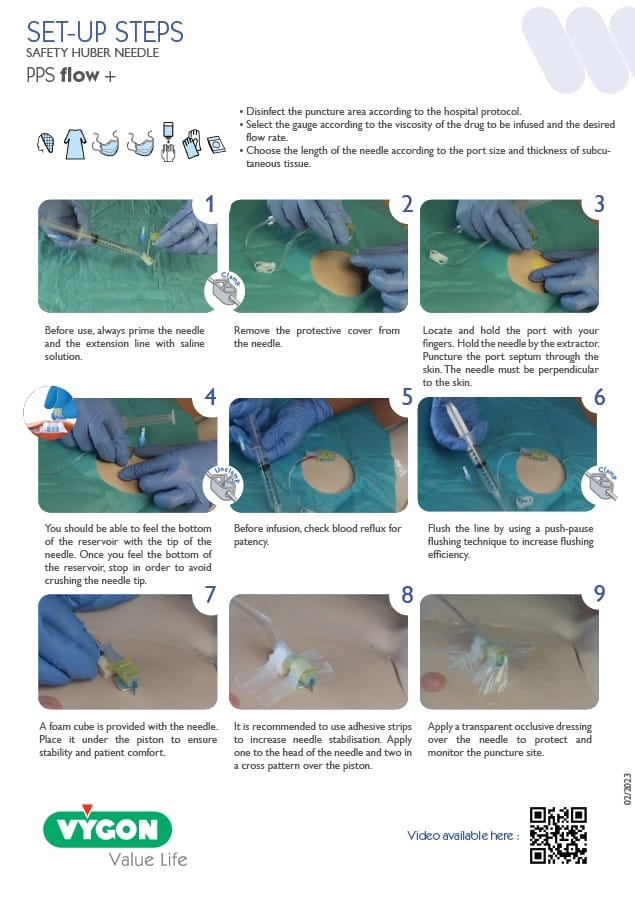
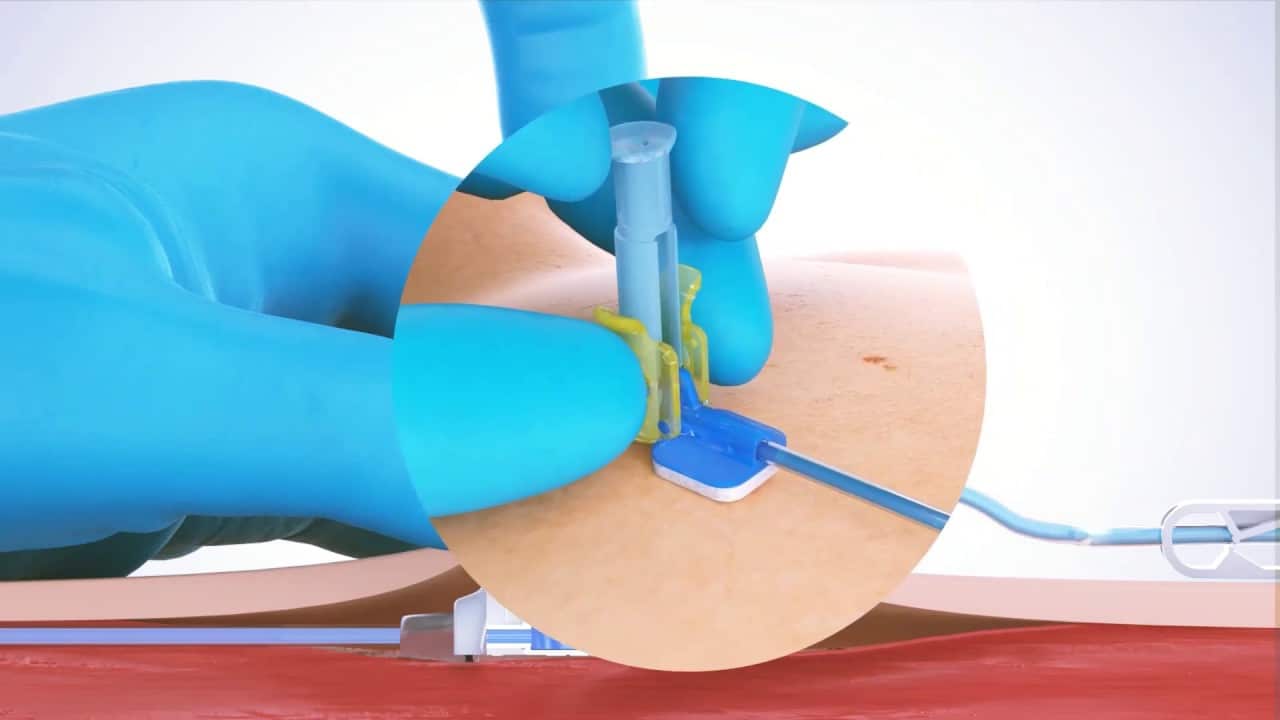
- Insert the needle at a 90°angle facing bevel opposite to the catheter line.
- The needle tip should be in contact with the bottom of the port reservoir without crushing it.
- Access is successful if a blood reflux is present and if there is no pain during injection.
- Pulsative flush is mandatory to ensure an effective flush of the port and avoid occlusion
Need more guidance or information on huber needles? Get in touch with a member of the Vygon team
Bevel orientation and the impact on flushing
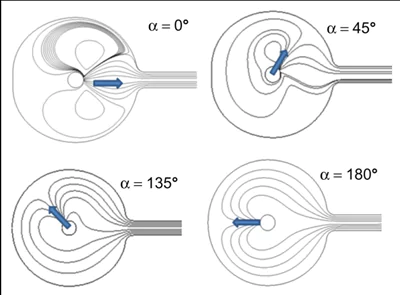
“Directing the Huber needle opening in the opposite direction of the implantable port exit channel increases the flushing efficiency and protein removal”
The direction of the Huber point when accessing a totally implantable venous access device can have an impact on the effectiveness of the flushing sequence. By orienting the bevel of the needle in the opposite direction from the outflow channel where the catheter is attached to the port body, the solution is forced to flow bidirectionally at 180◦ around the device which in testing demonstrated the greatest amount of protein removed1.
It is also important to position the bevel in the centre of the port as to close to the chamber wall will slow the flow rate and if the bevel is against the inside of the septum causes malfunction and extravasation.
Needle withdrawal:
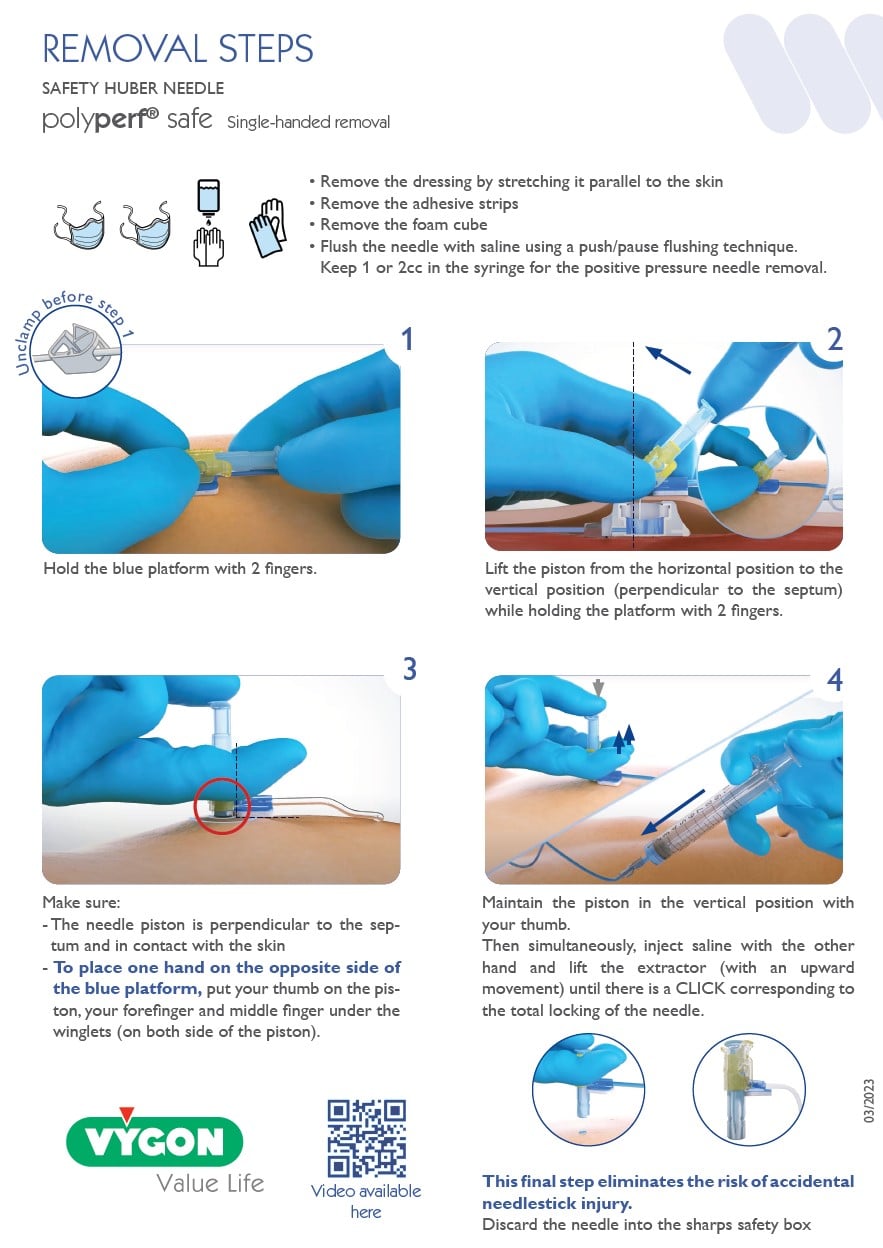
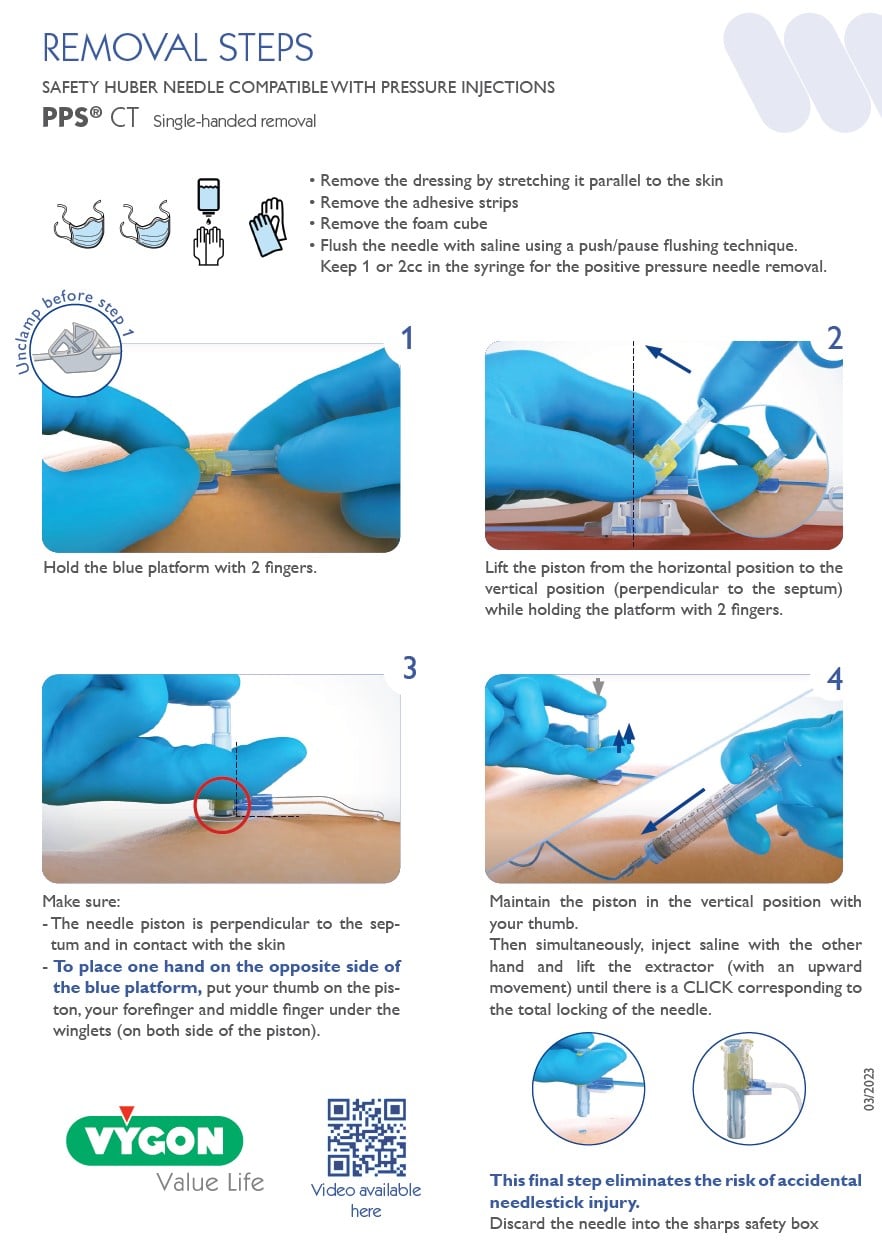
- Dressing removal
- Pulsative flush is mandatory to ensure an effective flush of the port and avoid occlusion
- Maintain positive pressure while needle is removed
- Apply a new dressing
Positive Pressure: Flush & Clamp vs Flush & Withdraw
According to Goossens, (2015) a positive pressure flush takes place when the syringe is removed from the end of the injection site whilst still flushing – this is to close the valve to prevent blood reflux back into the catheter which could cause an occlusion.
“This technique was defined as withdrawing the syringe from the injection site while still exerting pressure on the syringe plunger when injecting the last 0.5 mL”
Alternatively, reflux could be prevented by clamping the catheter while injecting the last 0.5 mL otherwise known as the clamping sequence.
However, if a needle free device (NFD) is connected, then the clamping sequence is also determined by which type of needle free device is connected (See Table1). This is subject to your Trust guidelines, but the NFD can be removed prior to the removal of the huber needle.
In the case of TIVADs, removing the needle using the positive pressure flush technique is recommended as it prevents blood return at the distal extremity of the catheter.
Why:
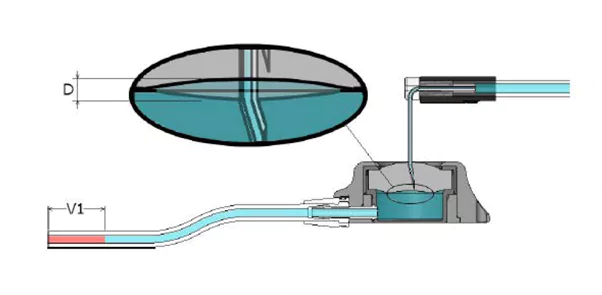
Due to the design of a port/TIVAD (totally implantable vascular access device), when the needle is removed, it creates a suction effect which leads to an upward distension of the septum, this creates negative pressure at the distal end of the attached catheter leading to blood reflux. (Lapou, 2010)
The application of positive pressure operates on the principle that reflux can be prevented by exerting a countervailing force to balance the negative pressure leading to blood reflux and thrombosis.
“It is important to bear in mind that positive pressure must be applied via active flushing with isotonic saline throughout the process of needle withdrawal in order to be fully effective.”
This method allows visual confirmation of positive pressure on removal of the needle, demonstrated by a small “splash of saline”.
Conclusion
Your role is fundamental for the care and maintenance of vascular access devices.
- Through risk prevention and by following evidence-based practice
- By being attentive to potential complications and symptoms
- Through patient information and therapeutic education
- By transferring your knowledge to your colleagues and to the insertion team
- Guiffant G, Durussel JJ, Flaud P, Vigier JP, Merckx J. Flushing ports of totally implantable venous access devices, and impact of the Huber point needle bevel orientation: experimental tests and numerical computation. Med Devices (Auckl). 2012;5:31-7. doi:
- Lapalu, (2010). Totally Implantable Port Management: Impact of Positive Pressure during Needle Withdrawal on Catheter Tip Occlusion (An Experimental Study). The journal of vascular access. 11. 46-51. 10.1177/112972981001100110.
- Goossens, 2015: https://www.ncbi.nlm.nih.gov/pmc/articles/PMC4446496/
- 2147/MDER.S30029. Epub 2012 Apr 16. PMID: 23166455; PMCID: PMC3500975.https://pubmed.ncbi.nlm.nih.gov/23166455/
Huber Needle Insertion & Removal Guides
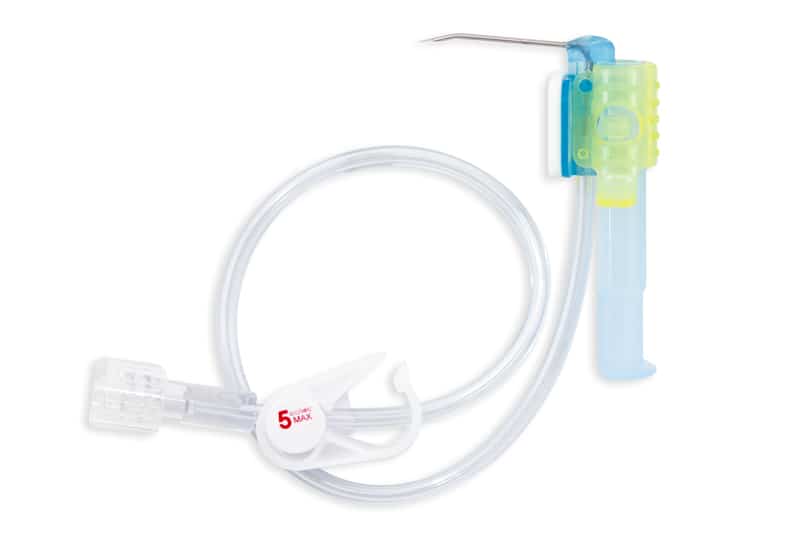
Discover our range of step-by-step guides for the safe insertion and removal of huber needles into a patient port site.
Below you will find a selection of guides for our range of huber needle devices that are ready to view and download to your device.
Here at Vygon, we are working towards a greener future, and this includes reducing our paper waste and encouraging the use of digital options. By making this move, we can guarantee you will be looking at the latest version of our guides but if you would prefer a printed copy, please get in touch with us on the contact form at the bottom of the page and we will arrange to send one to you.
View The Range
Polyperf Safe Insertion
For the safe insertion of the Polyperf Safe Huber Needle
Polyperf Safe Removal
For the safe removal of the Polyperf Safe Huber Needle
PPS CT Insertion
For the safe insertion of the PPS CT Huber Needle
PPS CT Removal
For the safe removal of the PPS CT Huber Needle
PPS Flow Insertion
For the safe insertion of the PPS Flow huber needle
PPS Flow Removal
For the safe removal of the PPS Flow Huber Needle


